Testnet Sentry Node Setup Guide
Please enable coin control and show Sentry Node tab from the options.
Note: If using an Operator to host your node you now need to follow their instructions. The following applies to self hosted nodes.#
SET UP VPS#
Log onto your Server using Putty as Root.#
Install Nano (Text editor)
Manual Install
Install Swap file if you have only 4gb Memory
Add the following line at the end of the file, then press Ctrl + X to close the editor, then Y and Enter save the file.
Install Syscoin Binaries :
We need to create the config file
Paste in the following:
Press Ctrl + X to close the editor and Y and Enter save the file
Run Syscoin Core
Check Blocks#
Install Sentinel
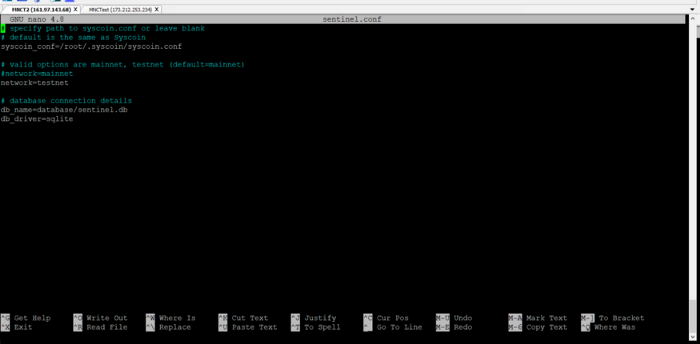
We now need to edit the sentinel config file
- If there is a # In front of syscoin_conf= then remove it and change it to syscoin_conf=/root/.syscoin/syscoin.conf
- Put a # next to network=mainnet and remove the # next to network=testnet to enable testnet version of sentinel.
Save
Should look like this
Finish Sentinel setup
Create a crontab entry to wake sentinel every 5 minutes.
Please wait and select Nano as the option if this is the first time you have done this and add this line to the end of the file, including * * * * *
* * * * * cd /root/sentinel && ./venv/bin/python bin/sentinel.py 2>&1 >> sentinel-cron.log
To Start Syscoind automatically on boot you can add this line.
//Thanks to Locutus
@reboot /usr/local/bin/syscoind -daemon >/dev/null 2>&1
Save
SETUP THE SENTRY NODE.
Return to QT
Note if using an existing address with seniority you will have to manually ‘lock’ the collateral until after you have registered the MN.#
Note the masternode.config file is no longer used.
More than one Sentry Node can not share the same collateral address, ownerKeyAddress or votingKeyAddress and payout address cannot be the same as owner or voting addresses.
Create a new address for collateral this does not need to be a legacy address anymore, or use an existing seniority address. This address can also be in an offline wallet that has signing capabilities.
Send exactly 100,000 tsys to this address
Identify the funding transaction#
Click Window> Console and enter the following command:
Note some commands now require an underscore
This should return a string of characters similar to the following:
The first long string is your collateralHash, while the last number is the collateralIndex.
Generate a BLS key pair#
A public/secret BLS key pair is required to operate a Sentry Node. The secret key is specified on the Sentry Node itself, and allows it to be included in the deterministic Sentry Node list once a provider registration transaction with the corresponding public key has been created.
If you are using a hosting service, they may provide you with their public key, and you can skip this step. If you are hosting your own masternode or have agreed to provide your host with the BLS secret key, generate a BLS public/secret keypair in the Console and entering the following command:
These keys are NOT stored by the wallet and must be kept secure, similar to the value provided in the past by the masternode genkey command.
Add the secret key to your Sentry Node configuration#
The public key will be used in following steps. The secret key must be entered in the syscoin.conf file on the Sentry Node. This allows the Sentry Node to watch the blockchain for relevant Pro*Tx transactions, and will cause it to start serving as a Sentry Node when the signed ProRegTx is broadcast by the owner (final step below). Log in to your Sentry Node using ssh or PuTTY and edit the configuration file as follows:
The editor appears with the existing configuration. Add this line in the file, replacing the key with your BLS secret key generated above (excluding “ ”) and also add your VPS external address
Press enter to make sure there is a blank line at the end of the file, then press Ctrl + X to close the editor and Y and Enter save the file. Note that providing a masternodeblsprivkey enables Sentry Node mode, which will automatically force the txindex=1, peerbloomfilters=1, and prune=0 settings necessary to provide Sentry Node service. We now need to restart the Sentry Node for this change to take effect. Enter the following commands, waiting a few seconds in between to give Syscoin time to shut down making sure you are in the root directory:
We will now prepare the transaction used to register the Sentry Node on the network.
Prepare a ProRegTx transaction#
A pair of BLS keys for the operator were already generated above, and the secret key was entered on the Sentry Node. The public key is used in this transaction as the operatorPubKey.
First, we need to get a new, unused address from the wallet to serve as the owner key address (ownerKeyAddr). This is not the same as the collateral address holding 100000 Sys. This address must be different for each MN. Generate a new address as follows:
This address can also be used as the voting key address (votingKeyAddr). Alternatively, you can specify an address provided to you by your chosen voting delegate, or simply generate a new voting key address as follows:
Then either generate or choose an existing address to receive the owner’s Sentry Node payouts (payoutAddress). This address cannot be the same as your owner or voting address, it is also possible to use an address external to the wallet:
You can also optionally generate and fund another address as the transaction fee source (feeSourceAddress). If you selected an external payout address, you must specify a fee source address.
Either the payout address or fee source address must have enough balance to pay the transaction fee, or the register_prepare transaction will fail.
The private keys to the owner and fee source addresses must exist in the wallet submitting the transaction to the network. If your wallet is protected by a password, it must now be unlocked to perform the following commands. Unlock your wallet for 5 minutes:
To see a list of common errors for the registration process click https://bittyjohn1954.medium.com/syscoin-4-2-masternode-error-codes-df0b80828f5f
You can use the registration helper blow but will need tto edit the first command generate to change the port to 18369
Sysnode.info provides Sentry Node Operators with information and tools, including tools that make it easier to participate in governance.
Manually
We will now prepare an unsigned ProRegTx special transaction using the protx_register_prepare command. This command has the following syntax:
Open a text editor such as notepad ++to prepare this command. Replace each argument to the command as follows:
collateralHash: The txid of the 100000 Syscoin collateral funding transactioncollateralIndex: The output index of the 100000 Syscoin funding transactionipAndPort: Sentry Node IP address and port, in the formatx.x.x.x:yyyyownerKeyAddr: The Syscoin address generated above for the owner addressoperatorPubKey: The BLS public key generated above (or provided by your hosting service)votingKeyAddr: The Syscoin address generated above, or the address of a delegate, used for proposal votingoperatorReward: The percentage of the block reward allocated to the operator as payment, 0 for no reward.payoutAddress: A Syscoin address to receive the owner’s Sentry Node rewardsfeeSourceAddress: An (optional) address used to fund ProTx fee.payoutAddresswill be used if not specified.
Note that the operator is responsible for specifying their own reward address in a separate update_service transaction if you specify a non-zero operatorReward. The owner of the Sentry Node collateral does not specify the operator’s payout address.
Either the feeSourceAddress or payoutAddress must hold a small balance since a standard transaction fee is involved.
Example (remove line breaks if copying):
Output:
Next we will use the collateralAddress and signMessage fields to sign the transaction, and the output of the tx field to submit the transaction.
Sign the ProRegTx transaction#
We will now sign the content of the signMessage (returned above) field using the public key for the collateral address as specified in collateralAddress. The wallet used to sign must hold the private key to the collateral address and note that no internet connection is required for this step, meaning that the wallet can remain disconnected from the internet in cold storage to sign the message. The command takes the following syntax:
Example: (excluding “ ”)
Output:
Submit the signed message#
We will now submit the ProRegTx special transaction to the blockchain to register the Sentry Node. This command must be sent from the wallet holding a balance on either the feeSourceAddress or payoutAddress, since a standard transaction fee is involved. The command takes the following syntax:
Where:
tx: The serialized transaction previously returned in thetxoutput field from theprotx_register_preparecommandsig: The message returned from thesignmessagebech32command
Example: (excluding “ ”)
Output:
Your Sentry Node is now registered and will appear on the Deterministic Sentry Node List after the transaction is mined to a block. You can view this list on the Masternodes tab in QT, or in the console using the command protx_list valid, where the txid of the final protx_register_submit transaction identifies your Sentry Node.
At this point you can go back to your terminal window and monitor your Sentry Node by entering
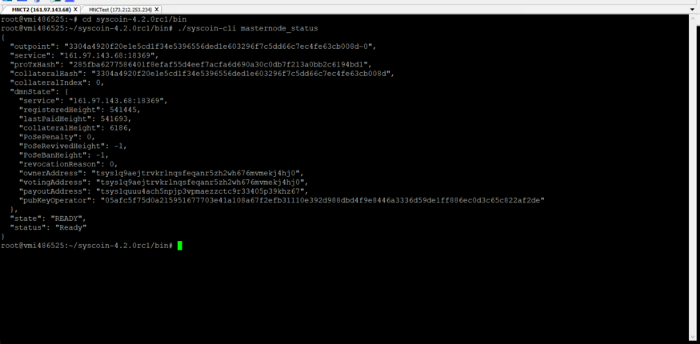
This information can also be seen by double clicking your Sentry Node in QT
Congratulations! Your Sentry Node is now running.